Flexible Care Pricing w/Memberships
Kew word | Kew word
This article will provide a basis for how to structure your programs and hourly pricing for a Flexible care modal based off of the Cradles or Joy modal from our owner.
In this article you will learn about the following:
- Setting up your billing and programs w/memberships
- Enrolling your children in memberships and programs
- Using Hourly Care and how it relates to memberships
Setting up your Billing and Programs
To set up your programs for a COJ pricing model, You’ll need to go into your Pricing Menu and set up the following items in the Pricing area.
First in the Programs area that you start in, using the blue create program button, you’ll need to set up the following programs.
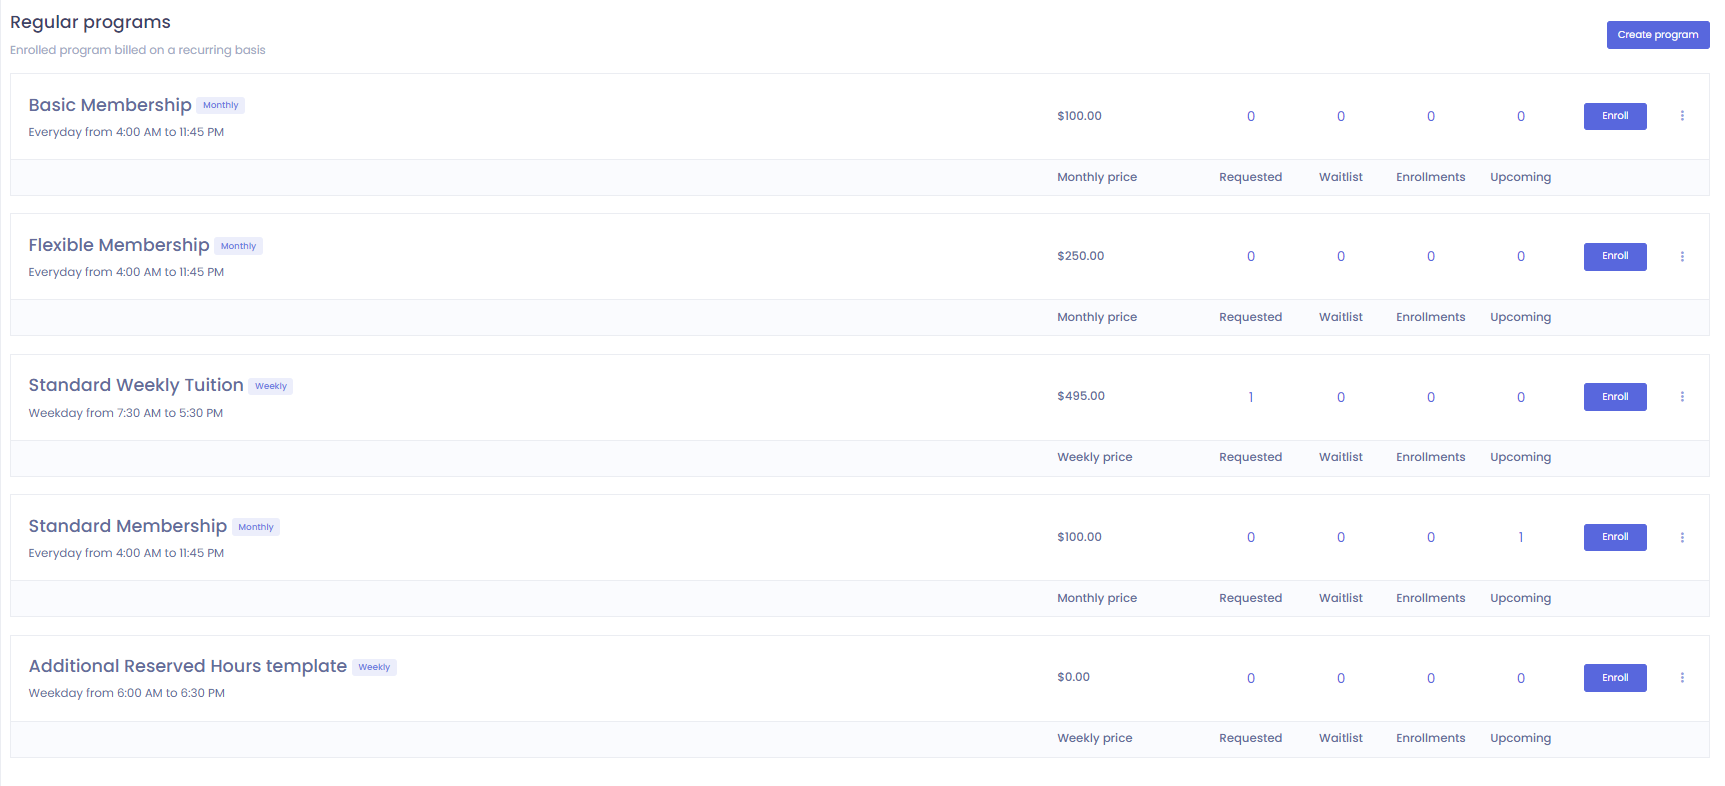
Basic Membership Program:
1. Set up your program available each day of the week from 4 AM to 11:45 PM.
2. Set your Max hours of usage for both Daily and Weekly boxes as zero.
3. Check the discounts box and set to use highest discount and apply discount rate of 24%
4. Price program to be monthly and set price at $100. You will not check the boxes to price by age or number of days.
5. Click save and create the program.
Flexible Membership:
1. Set up your program available each day of the week from 4 AM to 11:45 PM.
2. Set your Max hours of usage for both Daily and Weekly boxes as zero.
3. Check the discounts box and set to use highest discount and apply discount rate of 32%
4. Price program to be monthly and set price at $250. You will not check the boxes to price by age or number of days.
5. Click save and create the program.
Weekly Tuition Template:
1. Set up your program available Monday through Friday from 7:30 AM to 5:30 PM.
2. Set your Max hours of usage for Daily at 9 hours and for Weekly at 45 hours.
3. Check the discounts box and set to use highest discount and apply discount rate of 40%
4. Price program to be weekly and set price at $495. You will not check the boxes to price by age or number of days.
5. Click save and create the program.
Extended Hours template:
1.set up your program available for Monday through Friday from 6 AM to 6:30 PM
2. Set program to private
3. Price as zero leaving everything else blank
Please note: you are only going to be enrolling a child in this program between the hours of 6-7:30 AM and 5:30-6:30 PM.
Once finished your Programs should look like this.
Next you will go to the Flexible Care tab at the top left of the Pricing menu’s area. Under the hourly care section, you will need to set default hourly rate to $25.00 an hour

Lastly for the creation of Coupons you wish to use for certain items you will need to set up two different areas from which to use coupons based on if it will be for hourly rates or a program membership.
For coupons that will give discounts to hourly rates you’ll need to be inside the Flexible Care area and using the Rate Overrides section at the bottom, you will create a new Rate Override using the blue Add Override button.
1. Leave the override to apply on hourly rates and give it the name of the coupon you are offering to the child(ren).
2. Set your Hourly Rate for this coupon and click save.
Note: We will discuss to how to apply this later in the article.
For coupons that are being offered for membership programs, you’ll need to move over to the Charges & Credits section on the tabs in the top left corner of the Pricing Menu. To create a new credit to be used for a coupon, use the blue Add button to start making a credit.
1. Once you click the add button, choose New Credit from the list.
2. Name your credit so it matches the coupon you are offering.
3. Add the amount the coupon will take off from the membership. Choose dollar amount or percentage it will discount based on the coupon offering.
4. Make Available for regular program
5. Choose to apply to each billing cycle if this is not a coupon applied to only a first-time charge. If this is a first-time only coupon, please select it to be applied to only the first billing cycle.
6. Click Save and create your credit
Note: how to apply these credits will be covered later in the article.
Enrolling children into Programs and Memberships
When a new family is joining your center your will need to add at least one parent and the child to your system and then invite the family. For adding families, please see our article here describing this process.
Once the family has been invited, you will also need to give them the link or paperwork letting them know how to apply for a membership from within Seer. If you handle this at the front desk, you will do the following:
Enroll the child in a membership
1. Go to the child’s profile and on the left side of the screen, click the blue Add button in the services section and choose “enroll in program”.
2. Choose the Membership the child will be a part of
3. Set the days of the week to each day and set the time expected hours from 4 – 4:05 AM
4. Set your start date of the membership
5. If a coupon is to be applied to this membership, please make sure you select the box displayed that allows the coupon to be put in effect at this time.
6. If desired, you can pre-select a pod the child will belong to. If this is unknown, please leave as blank for now.
7. Click review and review the pricing and start date on the next screen. When you are done reviewing, click the enroll button to have the membership be started.
Enrolling a child in a weekly tuition program:
To first set up a unique program for this child you will need to go to the Pricing Menu and under the Programs section, you will use the 3-dot action menu on the Weekly Tuition Template and choose clone.
1. Name the cloned program to the name of the child so it will show as their unique program.
2. Set this program to be private so it doesn’t show on adult options if they are booking memberships.
3. In the cloned program, set the days and hours that are requested for the child in your days and hours the program is available for.
4. Scroll to the bottom and click save. The child’s new program should be now listed in your programs list page.
Next step will be to go to the child’s profile page. If the child has not yet been enrolled into a membership as well, complete the steps to have them be enrolled into their correct.
Then you will do the following in order to have your child enrolled in their program.
1. Go to the child’s profile and on the left side of the screen, click the blue Add button in the services section and choose enroll in program.
2. Choose the unique named program for this child
3. set the dates and times of the enrollment to match what is available for the program your created.
4. (optional) If you know what pod the child will be assigned to, you can now set that for this child. We do recommend this be done to help make it easier for the system to schedule the child into their pod (class) and allow them to be auto-assigned when checking into the center.
5. Click review and review the information. If everything looks correct for the enrollment, click enroll and the child will now be in their respective program.
Note: If the child needs to be put on a waitlist, you can choose the waitlist option and place the enrollment there until you are ready to approve it.
This will now show the child with two different program enrollments in the enrollments and recurring visits section. It will also allow you to have the child be charged their appropriate hourly charge when they are checked into the center outside of their normal hours they have from their enrollment.
If the child will want to use any extended hours, Clone your Extended hours program and price based on how many hours the family wants to use from 6-7:30 AM and 5:30-6:30 PM at $10 and hour. Ex. A family will use 5 hours of extended hours a week and you would price the program at $50. You will then want to enroll the child into this program using only the hours for extended care.
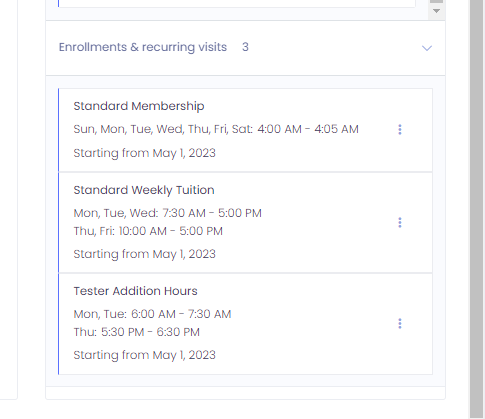
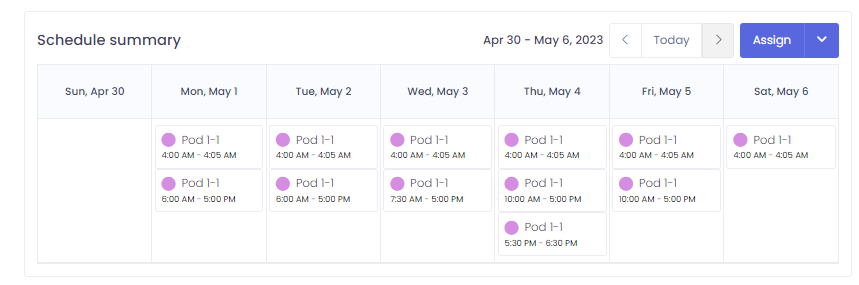
Here is an example of how a child's enrollment would look on their profile when enrolled in a Standard membership with weekly tuition and using some extra reserve hours as well as how their schedule would look.
If parents have been invited to Seer, they will have the option to choose these two memberships and request them for a child. They will also have the option to request enrollment with the weekly tuition template and this can be where you get the hours for the child’s attendance. These requests will show up in your requested section of the booking requests tab that is on your main dashboard for your review. If they need to add additional hours, have them message you what they need for you to enroll so you can book it as you need to set individual pricing and hours per child.
Hourly visits for children
When you would like to book an hourly visit for a child instead of the parent, you will go to the child’s profile and using the add button in the services section, you will choose hourly visit. Fill out all dates and times for the visit and make sure when you book the visit, you choose the standard hours it should be set to. This will ensure that the family is charged the correct hourly rate based on their membership program the child has been enrolled in.
Using Tags for Hourly Coupons
If you have used an hourly coupon for a family, you will want to create a tag and attach it to a child. For more info about creating tags, see our article here.
With this tag being on the child, it will help you to know when to use a rate override you had set up as an hourly coupon to be used upon checkout. When checking the child out, you will choose this rate override when it asks for the hourly charges to be assessed when the child is checked out from the system.
Related articles
- Article
- Article
- Article
- Article


